Wednesday, March 30, 2011

Capitol 10k Recap and Chocolate Covered Cookie Dough Balls!

Hey guys, happy Wednesday!
The annual Statesman Capitol 10k was this weekend and it was a race I have been looking forward to ever since I participated in it for the first time last year. Last year, I was doing it with a friend who doesn't run much so we were walking a lot of it but this year I wanted to actually try to get a real time!
This year I went with my sister and my dad. The weather was THE BEST weather it could have possibly been. At 9:30 it was a cool 60 degrees. A bit cloudy, but not humid what-so-ever. Perfect!
My dad and I
My sister Devon and I
 Do you have a feeling that those woman behind us were laughing at us? Because I think I do :P
I used a running pack I haven't used before by Amphipod (picture of actual running belt in the link) and it ended up giving me more trouble than I thought. It started riding up as I began to run and I had to tie it really high on my natural waist in order for it to stay put.

Other than that, the run went really well and I never got tired. I wanted to run that race again and again! The weather was absolutely perfect and I never got a stitch.

The only problem was that I started REALLY needing to go to the bathroom between mile one and two but I didn't want to slow down my time (the lines for the portapotties were at least a 10 minute wait). My original plan was to wait till I finished the race but that was NOT an option. Finally, one of the restroom stops (between mile 4 and 5, I know, harsh!) had only one lone runner waiting so I knew this was my best opportunity.  I knew it was taking away from my time but I just took the opportunity to rest so I could run faster as soon as I got out.
As I came up to the final meters of the race, I gave a huge wave to the camera-
I know. Embarrassing pictures, but that's all I got! (See how high I had to move my running belt up?)
Gosh, someone needs a tan. :P

Anyway, my goal was to do the 6.3 miles in an hour 5 minutes and as I was sprinting to the finish I saw that I was not going to make that time but I still went my all. My final time was one hour 7 minutes.
I blame the bathroom break; but either way, I didn't make it :/ Oh well!
The Statesman Cap 10k is always so fun to run and I can't WAIT till next year! I'm totally going to beat my time, and then some. :D
Oh, and at the finish I won a big bag of brown rice! You got to love the goodies they hand out, right?!
***

In other news, it seems my salted peanut butter caramel dark chocolate cups (whew, that's a long title!) weren't as ingenious and original as I first thought!

I was looking through David Lebovitz' blog when I came across a post titled "Chocolate-Covered Salted Peanut Caramel Cups". Le gasp

I immediately clicked on the post and found out that both of our recipes are quite similar. I think it's funny that we both went with the "salted" route and everything! :P

The difference between his and mine is that instead of a crunchy peanut butter layer, he adds peanuts to the caramel itself (props goes to the fact that the caramel is homemade). I might have to try his out and see which one comes out on top when it comes to taste... anything to give me an excuse to make something that is enrobed in chocolate, really :P


But in this post I will be talking about chocolate dippage in a different form. In the form of chocolate coated cookie dough balls!

I know, I know. You've seen the whole cookie dough ball dipped in chocolate thing a million times; but this..this is different. I swear!

The difference between mine and the run-of-the-mill cookie dough truffle is that the cookie dough itself is AH-MAY-ZING. Like, so amazing it may never even make it to the chocolate dipping stage before its all gone. Like, so amazing that no other chocolate chip cookie dough will ever meet the high standards that this cookie dough has made on your taste buds. Yes. That amazing.


And no, I can not take full credit for the dough portion of this recipe because I used a cookie dough recipe from Sugar Plum. This "anything goes" cookie dough recipe was meant to be, well baked, but I changed it up a bit to suit my needs (and make it just a tad healthier). Oh and PS, the original recipe for this dough makes fabulous (FAB-U-LOUS) cookies as well.
What's that, you want a picture first?
Well fine.
Okay now on to the recipe!
You will need:
2 tablespoons unsalted butter (NO SUBS!)
1/4 cup granulated sugar
1/4 cup packed brown sugar
1 pasteurized egg
1 tablespoon low fat cream cheese or yogurt
1/2 teaspoon vanilla extract
1/2 teaspoon baking soda
1/2 teaspoon baking powder
1/4 teaspoon salt
2/3 cup cake flour
1/3 cup whole wheat flour
2/3 cup add-ins (chocolate chips, pretzels, toffee bits, etc)


5 ounces dark chocolate chips + 1 ounce unsweetened chocolate


Melt butter in a small saucepan over medium heat; cook 1-2 minutes, whisking frequently, until butter foams and starts to brown. Pour butter into a large mixing bowl.

In large mixing bowl, using a mixer on medium speed, beat together butter, granulated sugar and brown sugar until well combined - about 1 minute. Beat in egg until mixture is light and airy - about 2 minutes. Beat in cream cheese, vanilla, baking soda, baking powder and salt until combined. Reduce mixer speed to low and beat in cake flour and whole wheat flour until just combined. Stir in the add-ins until combined. Chill dough for one hour.

Roll dough into 16 equal sized balls and freeze for 30 minutes.  

Melt chocolate in a microwave safe bowl and dip each ball into chocolate (keeping the rest in the freezer as you work). Place on a silicone mat and let sit at room temperature (or chill in refrigerator) until hard.
***
I used white chocolate chips and milk chocolate dipped pretzels (crushed). Next time I would probably do crushed pretzels and mini chocolate chips.
Also, I pasteurized an egg myself in order to save money (since I only needed one pasteurized egg).  It's really a lot more simple than you'd think! I used this post I found over at Baking Bites and it worked like a charm (:
You could always just use an egg substitute like flaxseed+water or applesauce, but I really think the egg adds something to the cookie dough that no substitute can do. Not only does it keep a traditional cookie dough taste this way, but it also emulsifies the butter-sugar mixture and adds creaminess and volume.


Okay so before I show you more pictures... I want to warn you that the balls exploded.
Yes, you read right, they exploded.
Exhibit A:
Exhibit B:
This one reminds me of a girl with a pony tail.
The reason? The baking soda and baking powder. I wanted to keep them in the dough for flavor but unfortunately these dough balls got too warm while sitting out on the counter that they actually started expanding inside their little chocolate cocoon. I put down a plate of perfectly beautiful chocolate truffles and turn around only to see they look like a science experiment gone terribly wrong!
Whatever, they still tasted amazing, and let me tell you why. 
Its all about the browned butter. It makes the cookie dough take on a caramel-like flavor. The salt only enhances the flavor and together they create outstanding deliciousness. Really, its like no other cookie dough I've tried before! 
Less than 24 hours and these puppies were gone. The thing I like about having them explode is that the dough is almost a little light and airy in the inside because of the carbon dioxide bubbles. You're almost biting into a cookie dough cloud but yet it sticks to your mouth like good ol' cookie dough does. Am I making sense?
 Not the prettiest, but hey, I'm not running a beauty pageant here.
Obviously, if you don't want explosions, then feel free to skip the baking soda and baking powder (or keep the dough balls refrigerated as soon as you dip them!)

So..the never ending debate; do you like cookie dough or baked cookies better?
For me, cookie dough seems to always taste better (gingerbread cookie dough is tha BOMB but I'm not as much a fan of the baked version) but in some cases (like meringue based cookies) the baked version can be better.

Saturday, March 26, 2011

Kashi Mediterranean Pizza and Siggi's Yogurt Review

It's not often that I eat frozen pizzas, especially when homemade ones are just SO good, but whenever I do heat one up, I go for Kashi.
I often see that a lot of people think that Kashi's pizzas are tasteless and resemble cardboard, but I honesty don't see that! Don't get me wrong, there's a bunch of people that love Kashi pizzas (like me!), but they certainly have some haters out there too.
I've tried a couple Kashi pizzas in the past, and I love their fresh, never greasy, flavors and the whole grain crust. The nutritional information is far superior to that of any other frozen pizza I've seen on the market.
The only downside? The size and the price.
I only buy these pizzas when they're on sale; otherwise they are way too expensive for the amount of pizza you're given. The pizza serves 3, but I always end up eating half.
They were recently on sale so I decided to try out a new flavor I haven't tried before, the Mediterranean.
The box is a little misleading; it is much larger than the actual pizza inside.
"Spinach, fire-roasted red onions & sweet red peppers, four signature cheeses including feta with roasted red pepper sauce on a stone-fired Kashi Seven Whole Grains & Sesame with flax seed crust".
Sounds good to me!
You can't really tell in the picture above, but the crust was oddly bent upward on the sides..
I was worried it would stay that way after coming out of the oven, but it ended up flattening out just fine.
After a quick trip in the oven (I love how short these take; 9 minutes!) dinner was ready.
It seems that one side kind-of got jipped on toppings, but that was easily fixed.
I started myself off with two pieces and steamed green beans-
And since I wanted to get the true flavor of the product, I kept one piece unadorned while I topped my other piece with the usual Parmesan cheese, red pepper flake, and a little dried oregano.
The verdict?
I really liked the taste! The feta cheese added a really nice tang and I loved the spinach and tomatoes. Every flavor was in perfect balance and it didn't have too much of any ingredient. However, I liked the slice that had the extra toppings better and eventually topped the unadorned slice with parm and seasonings as well. The pizza "blank" seemed to be missing something and needed that little pop. It also could use some more toppings but that always seems to be the case!

In the end, I would definitely buy this flavor again (after I try all the others!) and give it two thumbs up!
But really, Kashi never seems to disappoint me. All of their products have good ingredient lists and fabulous nutritionals, so it's a great brand to turn to when you want something that you know will be good for you.

***
Recently, my H-E-B has had Siggi's yogurt coupons for one dollar off ONE single serving container! They're usually $1.88, which is just way out there to ever be something I could buy on a regular basis, but at 88 cents I knew I had to try them out!
The in-store coupon has been available for a couple weeks so over that period of time I have gotten orange & ginger, blueberry, pomegranate & passion fruit, and vanilla which are the only flavors I have seen (at my grocery store).
If you aren't familiar with Siggi's, its a line of skyr yogurts that is VERY thick and creamy. Think how thick Fage yogurt is and then think much thicker, and that's the texture of skyr yogurt.
Ages ago, I remember trying the pomegranate & passion fruit yogurt, but it was so long ago that I couldn't recall much about it. I decided that I should take advantage of the dollar off coupon and get a couple to try out because they'll probably never be that cheap again!
First I tried the orange & ginger-
Naturally, I got out some orange segments for dipping. Oh and that is a piece of toast put under the broiler spread with ranch dressing and topped with mozzarella cheese. KILLER COMBO!! Sadly, I went a little overboard on the cheese, but it was still killa! (Try this..ASAP)
Now here is the BEST part about Siggi's...
Somehow, this extremely creamy, thick, and delicious substance is non fat, packed with protein, and only has 9 grams of sugar! Compare that to the usual 20-25 grams of other flavored greek yogurts.
And it only gets better with the ingredient list..
I really am not a fan of flavored greek yogurts (like chobani, fage, etc) because they always make them SO sweet! I like to eat yogurt in the morning, and I end up getting a headache because of the sweetness overload.
Siggi's, however just lightly sweetens their yogurt. Their yogurt is seriously everything I would ever want in a yogurt, and that's saying something.

I first tried my orange & ginger yogurt with a spoon as to get a clear taste of the actual product. It had an orange flavor, but it wasn't so in-your-face as other flavored yogurts are. I love the little bits of ginger throughout, but their wasn't enough! As a dip for oranges, the yogurt worked perfectly, but I decided to amp it up with a little bit more candied ginger.
After that simple addition, the yogurt went from fabulous to phenomenal! (Creamy, chewy, spicy, smooth...you get the picture)

I used the vanilla yogurt as a base for a dessert one night by popping it in the freezer for a bit just to give it a little "frozen yogurt" feel and then adding some crushed up chocolate covered pretzels and a chopped chocolate covered caramel.
This stuff is THICK, I'm telling you!
As you might be able to tell, there are actually REAL pieces of vanilla bean (the little black dots) in Siggi's vanilla yogurt. This one only has 10 grams of sugar (that's including natural lactose) and tastes better than any vanilla yogurt I have ever had.

As for the other two yogurts, I haven't tried them yet but I'm sure they're just as stellar.
If you like thick and creamy yogurt with subtle flavor, good ingredients, and just lightly sweetened, then Siggi's is definitely the way to go.
Unfortunately, Siggi's is just way too expensive for me to buy as my "go-to" yogurt. Especially since I really do just like plain old plain yogurt! Of course, it's so pricey because you're paying for quality ingredients. This yogurt is top-notch, people!

Are you a Kashi hater or lover? Ever heard of Siggi's yogurt before? I think this brand isn't well known because I haven't seen it much around the blog world, but it should be!

Thursday, March 24, 2011

I have a confession...

I have a confession.

Ever since my first experience making brownies with beans, I haven't been able to take them off my brain. 

Ever since then, I have plowed through our stash of black beans (again and again) in order to perfect them.

These multiple attempts for perfection have gone (mostly) undocumented by the camera's eye.

My family might turn into a bunch of bean brownies from their immense consumption of all the "failures." In fact, they may already have.

And here's the worst part, I still haven't achieved the perfect bean filled brownie!
I'll have you know, there's a lot of painstaking science that goes into creating a recipe and I absolutely LOVE it. (food science nerd alert)

Any who, I decided I should finally share with y'all some of my attempts.
This one was good, but it wasn't chocolaty enough and leaned too much on the immense amount of chocolate chips added for it's fudginess and overall flavor.
The next night I topped it with ice cream. Certainly NOT a bad idea.
I tried it again, this time adding more cocoa, less flour, some coffee powder,different mixing methods, etc.
Oh and made it S'more style.
Half the batter on the bottom, graham cracker layer, chocolate layer, marshmallows, other half of batter.
Delicious, and this "s'more" idea can be made with ANY batter, by the way.
Still no where near perfect. The brownie itself still wasn't up there.
Also I couldn't taste the graham cracker (weird?) and note to self: use milk chocolate not bittersweet chocolate chips for the full s'more effect.

I then made a version trying to convert a normal recipe into a bean brownie (leaving out eggs and fats/any liquid ingredients).
Uh fudgy disaster.
They had the same (super dense and fudge-like) consistency as the first bean brownies I made, but I wanted a cakier brownie. I thought since I used more flour it wouldn't be just like one hunk of bean fudge but, alas, it was.
They definitely had more chocolate flavor, which is what I wanted, but the mouth feel was all wrong!
I used half the batter to make some more s'more (hah!) brownies, except this time I put the graham crackers on the bottom, put all the batter on top, added milk chocolate chips, and then the layer of marshmallows.
No picture but that version turned out much better!

And finally, my latest experiment. I realized the other (unpictured) brownies didn't rise because I got rid of the eggs! The eggs are used as the leavening agent in brownies; I realized I would have to add a different leavening agent into the batter to give it the same effect the eggs would.
Through different debates on the amount of acidity in all my ingredients, ratio of flour and cocoa powder, how much and what kind of sugar, along with additional flavor-improving ingredients I finally came up with a recipe to try out that I was confident would get me that much closer to my goal.
The added leavening agents was a major improvement in the texture I was striving for! I split the batter into two and topped half of it with marshmallows and a peanut butter/milk chocolate/brown rice cereal mixture.
So how did this batch turn out?
Intense chocolate flavor? Check
Correct texture? Check
Appropriate sweetness? Check
Crunchy/glossy top? No
Overall flavor? Not quite there.
It's still a work in progress, but I'm almost there. The flavor is a little one-noted, so I think I may add something like cayenne. I also might decrease the flour, add a few more chocolate chips (and perhaps a variety like milk, dark, and semi-sweet), work on my order of mixing the ingredients together, etc.
These were SO good though! I can't wait to finally share with y'all the recipe once it's perfected.
These are rich and moist while being a little cakey at the same time. They definitely don't taste like airy "healthy" brownies, these are dense.

And if you're wondering about this peanut butter/chocolate/ rice combo I got going on-
I used this recipe (just for it's topping, not the brownie base) from Brown Eyed Baker. I've made her whole recipe before, and it's definitely a winner! This time, I accidentally cooked the marshmallows a little too long, but that just made em all toast and melt into the brownie a bit, which is alright by me!
I promise, I will share my well-tested black bean brownies AS SOON as I perfect them! (And trust me, they'll be worth the wait :P)
***
Not only have I been making brownies left and right, I also wanted to try out a recipe I saw on Oh She Glows a while ago. Her no bake crispies with chocolate fudge looked beyond delicious and I was attracted by the fact that Angela mentioned they were "not too sweet".
Since I didn't have any natural peanut butter laying around (I had Skippy Natural, but I have a feeling that's not what she meant) I blended up a cup of fresh roasted peanuts and ended up with the perfect amount to make the recipe! (I made a half batch)
I also made half the amount of "fudge" topping and it ended up being perfect amount (it made a little less than half a cup and she recommended using 3/4-1 cup for a full batch)
I'm surprised how closely mine resemble hers! They could be identical twins, I swear :D
Served on a holiday plate, of course.
I kept to the recipe except for using non vegan chocolate chips. These were deliciously chocolaty, crunchy, and smooth, and that fudge topping was the perfect touch! However, they do need to be kept refrigerated because they tend to get pretty sticky (or at least mine did).
My brother tried them out-
First bite, thinking..thinking...
and in for another!
I think he liked 'em :D

Mine turned out a little chewy from the brown rice cereal I used. I got it in bulk from Sprouts (a big bag costs like 80 cents) but I think I need to buy a brand name brown rice cereal that is packages in boxes so they stay fresh and keep their crispness because these ones never seem to stay super crispy and end up being a little gummy.

Obviously, the gummy rice didn't stop be from gobbling this (too) small batch right up!
Chocolate lovers NEED to check this recipe out!

***
When it comes to sweets do you prefer things with chocolate or with different flavors?
For me, it pretty much HAS to contain chocolate...I need to fulfill my chocolate cravings!

Tuesday, March 22, 2011

St. Patrick's Day Mint Chocolate Cake and Soda Bread

I realize I'm quite late on the St. Patrick's Day eats but I've just been really busy lately!
I'm glad you guys really enjoyed my Fit Buns. They really are the best of both worlds :)

I tried to keep the theme of St. Patrick's Day (aka green and Irish) for dinner with a green salad topped with green asparagus and Irish soda bread!
I love having salads as a main course because you can add so many fun toppings and, of course, get a lot of veggies in!
This salad was mixed greens topped with roasted asparagus along with onion, bell pepper, and tomato slices that were roasted with balsamic vinegar. Topped with a fillet of Tilapia with a spicy crust consisting of (a lot of) chili powder, garlic, and salt that was pan cooked in a little olive oil. Everything was so flavorful that there was no need for any dressing; just a squeeze of lemon juice and it was perfect.

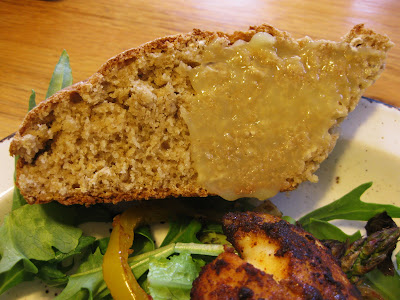
On the side I made a whole wheat Irish Brown Bread using this recipe except for using all whole wheat pastry flour (instead of a combination of regular whole wheat flour and all purpose) and using kefir instead of yogurt.
I think my kefir substitution caused it to be a little too "watery" so the dough was a little too loose and therefore spread out a bunch.
It's supposed to have a big X cross on the top and be a little taller, but the taste was still amazing!
I think we all really loved this bread. It's flavor isn't like normal whole wheat yeast bread; the yogurt tang puts it on a whole new level! The taste reminds me of buttermilk biscuits, yumm :D
Slathered with a little homemade lemon curd.
The best part about this bread? The crust! It's simply amazing. That bread plus that amazing salad = an out of this world delicious dinner. (:

The St. Patty's inspiration didn't stop when it came to dessert.
I had half a can of pumpkin in the fridge, which was just the perfect amount to make a half batch of my favorite chocolate cake recipe! This time I made the cake with brown rice syrup instead of corn syrup and added 3/4 teaspoon of peppermint extract to the batter.
As for the frosting, of course I went green and made a green mint cream cheese frosting/glaze to top the cake with peppermint extract, powdered sugar, low fat cream cheese, Brummel & Brown, and green food coloring.
DROOL.
Despite this being a half recipe, this still made a pretty sizable cake! I was able to cut it in half to add a layer of frosting to the middle.
Topped with a couple mini chocolate chips for fun and deliciousness. (:
This baby was cut into 6 pieces (which normally would be small with a half batch, but were quite large!) And topped with mint chocolate chip ice cream which, obv, was a really good idea.
SO GOOD!! I've said it before and I'll say it again, this chocolate cake recipe is a winner. It's so moist, chocolaty, and has the perfect texture. Chocolate and mint happen to be one of my favorite combinations so this was perfect. It's getting quite hot here in Texas, so the ice cream started to melt fast, but that just meant I had to gobble it up faster (:

***
My St. Patrick's day breakfast, however, was not Irish at all, but still worth sharing!
I made Tina's famous peanut butter, apricot, and walnut sandwich but the lazy girl's version :D
Since I don't like things too sweet, I didn't include the honey and used homemade unsweetened crunchy peanut butter. I forgot about the raisins, and I didn't have any walnuts, and didn't want to dirty a mixing bowl, so in fact, my sandwich may have tasted completely different than hers! Oh well :P
I topped two slices of whole wheat cinnamon raisin bread with crunchy peanut butter and apricot slices. Relatively same idea, right?!

Can we pause and talk about this cinnamon raisin bread for a minute? This is a staple I get from Sprouts that is absolutely divine. It's ingredient list is less than 10 ingredients long (I'll take a picture of it some day if I remember) it is 100% whole wheat, uses honey as it's sweetener, and it loaded with raisins and cinnamon chips! That's right, it not only has cinnamon flavor but has little tiny pockets of pure cinnamon in each bite. To. Die. For.
Sprouts, please never, ever stop making this bread!!
***
Anyway, back to the sandwich.
After my first bite, I thought the combination of the cinnamon bread, apricots, and peanut butter was delicious but it needed something to kind of bind it together. Something creamy that wasn't sweet to counterbalance the sticky and sweet filling.
At first I thought cream cheese, but then changed my mind and went with a slather of plain Greek yogurt (I'm sure cream cheese would have also be good).

Ahh. Perfection. I need to combine dried fruit with nut butter more often!
I would definitely recommend you make some sort of version of this sandwich soon (or the original!).

What's your favorite breakfast sandwich?
I still think my favorite has to be a "carrot cake" sandwich, with cream cheese, shredded carrot, raisins, walnuts, and coconut on cinnamon raisin bread! So, so good.

Thursday, March 17, 2011

Fit Buns

In the blog world, a day doesn't go by without seeing sandwich thins or thin buns show up on someone's blog. There's a good reason why, too. They have become a phenomenon because they're great for making a sandwich without loading up on all the bread. They let the ingredients stand out while the bun stays on the back burner as merely the mode of transportation. Many people appreciate that they're a scant 100 calories compared to other bun and bread product choices out there.
I, for one, buy them occasionally, but they're certainly not a staple (and when I do, I get the Earth Grains brand, with natural ingredients and no artificial sweeteners). The reason I'm not in love with them like many others is because they're just a little too thin. They're great for some applications, but not for most. If I try to toast them, they turn into crisp disks because they're so thin. I like the idea, but I wish they came out with a thicker, yet still relatively thin version keeping that great hearty chew.
So it got me thinking...
What if I made fit buns? Like their thin bun relatives, but...healthier. Its OK to have a little curves, right? Just like how society needs to stop associating skinny or thin as the ideal beauty, we shouldn't bring that "thin" word into a food product that touts it's low calorie count. I don't want to be thin, I want to be fit.
Enter: Fit Buns.
These were super simple to make and its nice being able to decide what exactly goes into it.

I used my favorite whole wheat sandwich bread recipe as the base, but 3/4ed it because I ran out of whole wheat flour (gasp!). I used honey as my sweetener of choice and instead of walnuts and sunflower seeds I used flax seeds (1 tablespoon whole, 2 tablespoons milled) and roasted pepitas.
After a trip through the dough cycle in the trusty bread machine, I rolled the dough out just like one would for cut-out cookies.
I can't say how thin, because I don't remember, but I think it was around a quarter inch thick (they will grow).
Then, I used a cup's rim as a cookie cutter and cut out little fit buns. I ended up cutting out 8 and then using the remaining dough to make 3 big buns (shall I call them chubby buns?) for my dad.
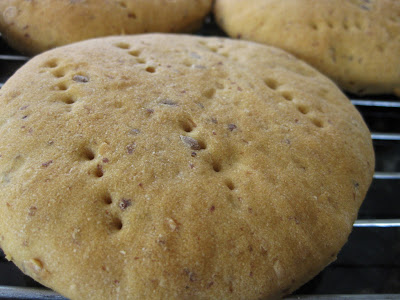
For fun, I poked each bun with a fork a couple times to give them that trademark dimpled look.
Cover them with plastic wrap sprayed with oil, and let them rise in a warm place for 30 to 45 minutes.
Bake them at 350 (preferably on a pizza stone, but not required) for 15-18 minutes and they're done!
The benefit of cutting them out (with a biscuit cutter, cookie cutter, the rim of a cup, etc) is that you get a much more uniform size. As you can see, the chubby buns are a little on the lumpy side compared to the fit buns because I just rolled them into balls and pressed them flat.

Here's a shot showing their thickness, using a penny as a point of reference-
Not too skinny, not too big, just right. :)

I had a veggie burger awaiting me in the freezer that was just begging to be paired with a fit bun, and well, I'm a pushover...
And let's be honest, I love veggie burgers and I was dying to test out one of my fit buns.
Cut open-
Fluffy, yet chewy and full of good-for-you grains! :D
Stuffed with a Gardenburger original veggie burger, tomato, ketchup, mustard, romaine, and red onion.
These buns were the perfect size for veggie burgers!
CHOMP-
PERFECT!!!
All I can say is, these are amazing. They have a great crust, a fluffy (but not crumbly) interior, and there's that amazing crunch of the occasional pepita along with the nuttiness of the flax.
I did a rough calculation of each fit bun and came up with each bun being around 140 calories, 4 grams of fiber, and 5 grams of protein...sweetness!
And can we talk for a minute about the Gardenburger Original flavor? I like them, but there's something off and I can't pin it. The texture is perfect, and I love the gooey pockets of cheese, but there seems to be some weird chemical taste to it.. to me, it almost tastes like bleu cheese (which I am not a fan of) yet bleu cheese is not on the ingredient list. Anyone else have this problem?

These fit buns can be made with any sandwich bread recipe, if you happen to have a favorite you'd rather use instead. It's really not so much a recipe but a process/idea. Totally try it out, you'll be a fit bun convert!


Are you a fan of sandwich thins?